In this tutorial you will learn about the AngularJS CRUD With Php MySql REST API or Webservice Example and its application with practical example.
AngularJS CRUD With Php MySql REST API or Webservice
In this AngularJS CRUD with Php/MySql tutorial, I’ll show you how to create a simple AngularJS CRUD application with PHP/MySql REST API or Webservice . In this step by step tutorial, we will be creating a simple AngularJS SPA blog application with PHP/MySql restful API. In this article, you will learn how to create fully functional CRUD (Create, Read, Update and Delete) REST API using PHP/MySql and integrate it with AngularJS Single Page Application. So, you have to just follow this step by step angularJS crud application tutorial to create a fully functional angularjs blog application.
Projects Directory Structure :-

Create Database Table and Configuration File
Step 1:- Create DB and Posts Table
In this step we will create a database and posts table in it. I have created a database with name “crudone” and created a “posts” table inside in it. So you also need to create a database with name of your choice and put “posts” table in it. You can create “posts” table using the mysql query given as following –
|
1 2 3 4 5 6 7 |
CREATE TABLE `posts` ( `id` int(10) UNSIGNED NOT NULL, `title` varchar(255) COLLATE utf8_unicode_ci NOT NULL, `description` text COLLATE utf8_unicode_ci NOT NULL, `created_at` timestamp NULL DEFAULT NULL, `updated_at` timestamp NULL DEFAULT NULL ) ENGINE=InnoDB DEFAULT CHARSET=utf8 COLLATE=utf8_unicode_ci; |
Step 2:- Create DB Config file
Now, we will create a database configuration file to hold database credentials and database connection. Let’s create db_config.php file in your project root directory and put the following code in it –
db_config.php
|
1 2 3 4 5 6 7 |
<?php define ('DB_USER', "root"); define ('DB_PASSWORD', ""); define ('DB_DATABASE', "crudone"); define ('DB_HOST', "localhost"); $mysqli = new mysqli(DB_HOST, DB_USER, DB_PASSWORD, DB_DATABASE); ?> |
Step 3:- Create index.php file
Next, we will create index.php file in project root directory and put the following code in it –
index.php
|
1 2 3 4 5 6 7 8 9 10 11 12 13 14 15 16 17 18 19 20 21 22 23 24 25 26 27 28 |
<html lang="en"> <head> <title>AngularJS Simple CRUD Application - W3Adda</title> <link rel="stylesheet" href="//netdna.bootstrapcdn.com/bootstrap/3.0.0/css/bootstrap.min.css"> <script src="//cdnjs.cloudflare.com/ajax/libs/jquery/2.1.3/jquery.min.js"></script> <script src="//cdnjs.cloudflare.com/ajax/libs/twitter-bootstrap/3.3.1/js/bootstrap.min.js"></script> <!-- Angular JS --> <script src="https://ajax.googleapis.com/ajax/libs/angularjs/1.3.2/angular.min.js"></script> <script src="https://ajax.googleapis.com/ajax/libs/angularjs/1.3.2/angular-route.min.js"></script> <!-- My App --> <script src="app/routes.js"></script> <script src="app/helper/myHelper.js"></script> <!-- App Controller --> <script src="app/controllers/PostController.js"></script> </head> <body ng-app="main-App"> <div class="container"> <ng-view></ng-view> </div> </body> </html> |
Create PHP/MySql CRUD REST API
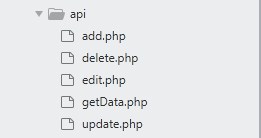
Now, after creating database and posts table in it we are ready to implement Restful CRUD (Create, Read, Update and Delete) API. We will create a separate api directory in our project folder to keep all API files in it like as below.

now we will be creating separate files for each of the individual CRUD operation and put the given code accordingly.
api/add.php
This file holds the logic to add blog posts into the database.
|
1 2 3 4 5 6 7 8 9 10 11 12 13 14 |
<?php require '../db_config.php'; $post = file_get_contents('php://input'); $post = json_decode($post); $sql = "INSERT INTO posts (title,description) VALUES ('".$post->title."','".$post->description."')"; $result = $mysqli->query($sql); $sql = "SELECT * FROM posts Order by id desc LIMIT 1"; $result = $mysqli->query($sql); $data = $result->fetch_assoc(); echo json_encode($data); ?> |
api/edit.php
This file holds the logic to fetch and return a single blog post with given id for editing.
|
1 2 3 4 5 6 7 8 9 10 |
<?php require '../db_config.php'; $id = $_GET["id"]; $sql = "SELECT * FROM posts WHERE id = '".$id."'"; $result = $mysqli->query($sql); $data = $result->fetch_assoc(); echo json_encode($data); ?> |
api/update.php
This file holds the logic to update blog posts with given id into the database.
|
1 2 3 4 5 6 7 8 9 10 11 12 13 14 15 16 |
<?php require '../db_config.php'; $id = $_GET["id"]; $post = file_get_contents('php://input'); $post = json_decode($post); $sql = "UPDATE posts SET title = '".$post->title."', description = '".$post->description."' WHERE id = '".$id."'"; $result = $mysqli->query($sql); $sql = "SELECT * FROM posts WHERE id = '".$id."'"; $result = $mysqli->query($sql); $data = $result->fetch_assoc(); echo json_encode($data); ?> |
api/getData.php
This file holds the logic to fetch and return all blog posts from the database.
|
1 2 3 4 5 6 7 8 9 10 11 12 13 14 |
<?php require '../db_config.php'; $sql = "SELECT * FROM posts"; $result = $mysqli->query($sql); while($row = $result->fetch_assoc()){ $json[] = $row; } $data['data'] = $json; $result = mysqli_query($mysqli,$sql); echo json_encode($data); ?> |
api/delete.php
This file holds the logic to delete a single blog post from the database.
|
1 2 3 4 5 6 7 8 |
<?php require '../db_config.php'; $id = $_GET["id"]; $sql = "DELETE FROM posts WHERE id = '".$id."'"; $result = $mysqli->query($sql); echo json_encode([$id]); ?> |
Create AngularJS CRUD Appilication
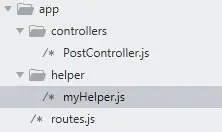
Now, after done with all the backend Rest Api we are ready to create frontend AngularJS CRUD application. We will creating a separate app directory in our project’s root directory to keep all AngularJS files in it like as below.

Create AngularJS Routing File
So first we will create a routes.js file inside app folder to hold all of the application routing logic. Let’s create routes.js file and put bellow code in it.
app/routes.js
|
1 2 3 4 5 6 7 8 9 |
var app = angular.module('main-App',['ngRoute']); app.config(['$routeProvider', function($routeProvider) { $routeProvider. when('/', { templateUrl: 'templates/posts.html', controller: 'PostController' }); }]); |
Create AngularJS Controller File
Now we will create a AngularJS controller file “app/controller/PostController.js” to hold CRUD Operation logic. We will create a separate controller directory in app folder and create PostController.js file in it and put the following code in it.
app/controller/PostController.js
|
1 2 3 4 5 6 7 8 9 10 11 12 13 14 15 16 17 18 19 20 21 22 23 24 25 26 27 28 29 30 31 32 33 34 35 36 37 38 39 40 41 42 43 44 45 46 47 48 49 50 51 52 53 54 55 56 57 58 59 60 |
var URL = "http://localhost/w3adda-angularjs/angularjs-simple-crud"; app.controller('PostController', function($scope,$http){ $scope.data = []; getResultsPage(); function getResultsPage() { $http({ url: URL + '/api/getData.php', method: 'GET' }).then(function(res){ $scope.data = res.data.data; }); } $scope.saveAdd = function(){ $http({ url: URL + '/api/add.php', method: 'POST', data: $scope.form }).then(function(data){ $scope.data.push(data.data); $(".modal").modal("hide"); }); } $scope.edit = function(id){ $http({ url: URL + '/api/edit.php?id='+id, method: 'GET' }).then(function(data){ $scope.form = data.data; }); } $scope.saveEdit = function(){ $http({ url: URL + '/api/update.php?id='+$scope.form.id, method: 'POST', data: $scope.form }).then(function(data){ $(".modal").modal("hide"); $scope.data = apiModifyTable($scope.data,data.data.id,data.data); }); } $scope.remove = function(post,index){ var result = confirm("Are you sure delete this post?"); if (result) { $http({ url: URL + '/api/delete.php?id='+post.id, method: 'DELETE' }).then(function(data){ $scope.data.splice(index,1); }); } } }); |
Create AngularJS Helper File
Now we will create a AngularJS Helper file “app/helper/myHelper.js“ to hold all helper function . We will create a separate helper directory in app folder to hold all helper functions in it. Let’s create myHelper.js file in “app/helper/” directory and put the following code in it.
app/helper/myHelper.js
|
1 2 3 4 5 6 7 8 |
function apiModifyTable(originalData,id,response){ angular.forEach(originalData, function (item,key) { if(item.id == id){ originalData[key] = response; } }); return originalData; } |
Create AngularJS Template File
Finally we will create a template file. In AngularJS when we visit any angularjs route then it will output using one of the angularjs template file. We will create a separate template directory in app folder to hold all the project template files in it. Here we will create posts.html file in it and put the code given below for all the CRUD Operations.
templates/posts.html
|
1 2 3 4 5 6 7 8 9 10 11 12 13 14 15 16 17 18 19 20 21 22 23 24 25 26 27 28 29 30 31 32 33 34 35 36 37 38 39 40 41 42 43 44 45 46 47 48 49 50 51 52 53 54 55 56 57 58 59 60 61 62 63 64 65 66 67 68 69 70 71 72 73 74 75 76 77 78 79 80 81 82 83 84 85 86 87 88 89 90 91 92 93 94 95 96 97 98 99 100 101 102 103 104 105 106 107 108 109 110 111 112 113 114 115 116 117 |
<div class="row"> <div class="col-lg-12 margin-tb"> <div class="pull-left"> <h1 style="color:#3276B1"><strong>AngularJS Simple CRUD Application - W3Adda</h1> </div> <div class="pull-right" style="padding-top:30px"> <button class="btn btn-success" data-toggle="modal" data-target="#create-user">Add New</button> </div> </div> </div> <table class="table table-bordered pagin-table"> <thead> <tr> <th>No</th> <th>Title</th> <th>Description</th> <th width="220px">Action</th> </tr> </thead> <tbody> <tr ng-repeat="value in data"> <td>{{ $index + 1 }}</td> <td>{{ value.title }}</td> <td>{{ value.description }}</td> <td> <button data-toggle="modal" ng-click="edit(value.id)" data-target="#edit-data" class="btn btn-primary">Edit</button> <button ng-click="remove(value,$index)" class="btn btn-danger">Delete</button> </td> </tr> </tbody> </table> <!-- Create Modal --> <div class="modal fade" id="create-user" tabindex="-1" role="dialog" aria-labelledby="myModalLabel"> <div class="modal-dialog" role="document"> <div class="modal-content"> <form method="POST" name="addItem" role="form" ng-submit="saveAdd()"> <div class="modal-header"> <button type="button" class="close" data-dismiss="modal" aria-label="Close"><span aria-hidden="true">×</span></button> <h4 class="modal-title" id="myModalLabel">Add Post</h4> </div> <div class="modal-body"> <div class="container"> <div class="row"> <div> <strong>Title : </strong> <div class="form-group"> <input ng-model="form.title" type="text" placeholder="Name" name="title" class="form-control" required /> </div> </div> </div> <div class="row"> <div> <strong>Description : </strong> <div class="form-group" > <textarea ng-model="form.description" class="form-control" required> </textarea> </div> </div> </div> <div class="text-right"> <button type="button" class="btn btn-default" data-dismiss="modal">Close</button> <button type="submit" ng-disabled="addItem.$invalid" class="btn btn-primary">Submit</button> </div> </div> </div> </form> </div> </div> </div> </div> <!-- Edit Modal --> <div class="modal fade" id="edit-data" tabindex="-1" role="dialog" aria-labelledby="myModalLabel"> <div class="modal-dialog" role="document"> <div class="modal-content"> <form method="POST" name="editItem" role="form" ng-submit="saveEdit()"> <input ng-model="form.id" type="hidden" placeholder="Name" name="name" class="form-control" /> <div class="modal-header"> <button type="button" class="close" data-dismiss="modal" aria-label="Close"><span aria-hidden="true">×</span></button> <h4 class="modal-title" id="myModalLabel">Edit Post</h4> </div> <div class="modal-body"> <div class="container"> <div class="row"> <div> <strong>Title : </strong> <div class="form-group"> <input ng-model="form.title" type="text" placeholder="Name" name="title" class="form-control" required /> </div> </div> </div> <div class="row"> <div> <strong>Description : </strong> <div class="form-group"> <textarea ng-model="form.description" class="form-control" required> </textarea> </div> </div> </div> <div class="text-right"> <button type="button" class="btn btn-default" data-dismiss="modal">Close</button> <button type="submit" ng-disabled="editItem.$invalid" class="btn btn-primary create-crud">Submit</button> </div> </div> </div> </form> </div> </div> </div> </div> |
Start Application
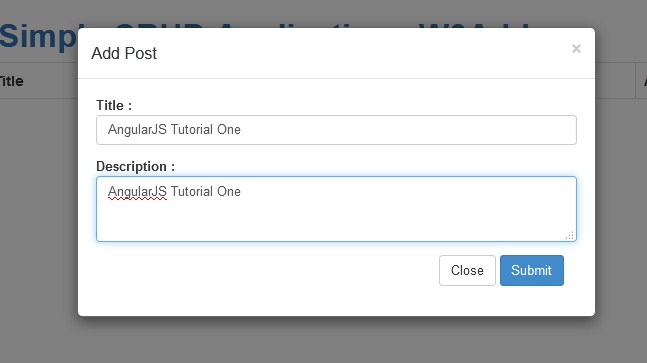
Lets start the application and visit it to see following output –
Output :-

Create Post –

List Posts –

Edit Post –

Update Post –

Delete Post –


