In this tutorial you will learn about the How to Generate Barcode In Laravel 8 and its application with practical example.
How to Generate Barcode In Laravel 8
In this tutorial, we will learn how to generate barcode in laravel 8 application. I’ll guide you through step by step for generation of barcode in a laravel 8 application. We will be using ‘picqer/php-barcode-generator’ package for generating barcode in laravel 8. In this tutorial, we will guide you step by step to generate bar code in your laravel 8.
Step By Step Laravel 8 Barcode Generation Tutorial
Contents:-
- Install Laravel 8
- Setup Database Credentials
- Install picqer/php-barcode-generator Package
- Define Route
- Create Blade View
- Start Development Server
- Conclusion
Install Laravel 8
First of all we need to create a fresh laravel project, download and install Laravel 8 using the below command
|
1 |
composer create-project --prefer-dist laravel/laravel lara8blog |
Make sure you have composer installed.
Setup Database Credentials
Now, lets create a MySQL database and connect it with laravel application. After creating database we need to set database credential in application’s .env file.
|
1 2 3 4 5 6 |
DB_CONNECTION=mysql DB_HOST=127.0.0.1 DB_PORT=3306 DB_DATABASE=lara8blog DB_USERNAME=root DB_PASSWORD= |
Install picqer/php-barcode-generator Package
We will be using “picqer/php-barcode-generator” Package” for generating barcode in laravel 8 application. In this step we will be installing “picqer/php-barcode-generator” via following composer command, lets open your terminal and switch to the project directory and enter the following command –
|
1 |
composer require picqer/php-barcode-generator |
Set Routes
After this, we need to add following two routes in “routes/web.php” to display barcode. Lets open “routes/web.php” file and add following route.
routes/web.php
|
1 |
Route::view('barcode', 'barcode'); |
Create View/Blade File
In this step, we will create view/blade file to display barcode. Lets create a “barcode.blade.php” file in “resources/views/barcode/” directory and put the following code in it.
resources/views/barcode/barcode.blade.php
|
1 2 3 4 5 6 7 8 9 10 11 12 13 14 15 16 17 18 19 20 21 |
<!DOCTYPE html> <html> <head> <title>Generate Bar Code in Laravel - W3Adda.com</title> </head> <body> <h1>Generate Bar Code in Laravel - W3Adda.com</h1> <h3>Product: 0123456789</h3> @php $generator = new Picqer\Barcode\BarcodeGeneratorHTML(); @endphp {!! $generator->getBarcode('0123456789', $generator::TYPE_CODE_128) !!} <h3>Product 2: 0987654321</h3> @php $generatorPNG = new Picqer\Barcode\BarcodeGeneratorPNG(); @endphp <img src="data:image/png;base64,{{ base64_encode($generatorPNG->getBarcode('0987654321', $generatorPNG::TYPE_CODE_128)) }}"> </body> </html> |
Start Development Server
Now we are ready to run our example so lets start the development server using following artisan command –
|
1 |
php artisan serve |
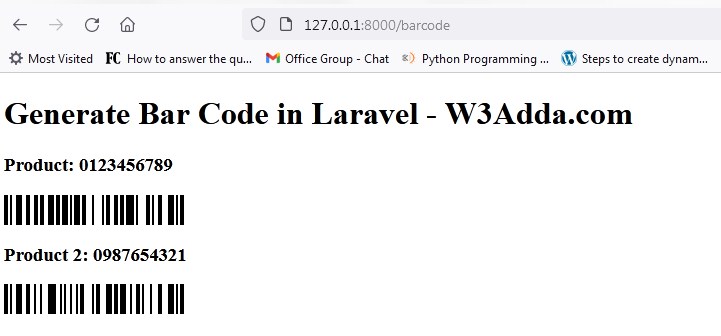
Now, open the following URL in browser to see the output –
http://localhost:8000/barcode
Output:-


