In this tutorial you will learn about the How to Send Email in Laravel 8 with Mailable and Mailtrap and its application with practical example.
How to Send Email in Laravel 8 with Mailable and Mailtrap
In this tutorial we will learn how to send email in laravel 8 using mailable and mailtrap. We will use Laravel 8 builtin mailable markdown class to send emails. In order to send email using mailtrap we will implement laravel 8 builtin mailable markdown class. In this post I’ll show you how to integrate mailtrap to send email in laravel 8 application.
Laravel 8 provides builtin mailable markdown class to send emails. In Laravel 8 you can use mailtrap, smtp, Mailgun, Postmark, Amazon SES, and sendmail for sending emails. You are required to configure driver details on the .env file.
In this step by step tutorial you will understand how to send emails in Laravel 8 with the help of Mailtrap. We will explain to you how to use Laravel 8 builtin mailable markdown class to send emails using Mailtrap.
Install Laravel 8
First of all we need to create a fresh laravel project, download and install Laravel 8 using the below command
|
1 |
composer create-project --prefer-dist laravel/laravel lara8blog |
Make sure you have composer installed.
Setup Laravel 8 Database Credentials
Now, lets create a MySQL database and connect it with laravel application. After creating database we need to set database credential in application’s .env file.
|
1 2 3 4 5 6 |
DB_CONNECTION=mysql DB_HOST=127.0.0.1 DB_PORT=3306 DB_DATABASE=lara8blog DB_USERNAME=root DB_PASSWORD= |
Setting Up Mailtrap Mail Configuration
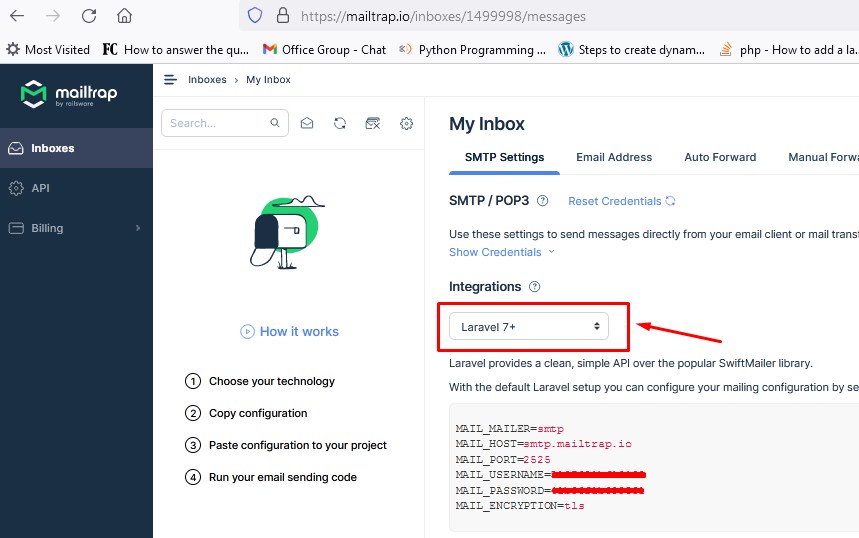
Before you start sending emails using mailtrap from your laravel 8 application, you are you need a mailtrap configuration to configure SMTP settings in your laravel project. Here is how you can get the required credentials from mailtrap.
- Create an account using GitHub or Email at mailtrap.io
- Login to your mailtrap account
- Create inbox project
- Click on the settings icon
- Go to the SMTP/POP3 tab
- Select Laravel from the Integrations dropdown
- Copy the Laravel mailer details

Now, open .env file within your application’s root directory and set up mailtrap configuration as following:
|
1 2 3 4 5 6 7 |
MAIL_MAILER=smtp MAIL_HOST=smtp.mailtrap.io MAIL_PORT=2525 MAIL_USERNAME= // mailtrap username MAIL_PASSWORD= // mailtrap password MAIL_ENCRYPTION=tls MAIL_FROM_ADDRESS= // email from address |
Create Laravel Markdown Mailable Class
The mailable class in Laravel used for sending emails. Now, lets create a new laravel mailable class using following artisan command:
|
1 |
php artisan make:mail DemoEmail --markdown=Email.demoEmail |
Once the above command executed, it will create a new laravel mailable class DemoEmail.php in app/Mail/ directory. Open the DemoEmail.php file and put the following code in it.
|
1 2 3 4 5 6 7 8 9 10 11 12 13 14 15 16 17 18 19 20 21 22 23 24 25 26 27 28 29 30 31 32 33 34 35 |
<?php namespace App\Mail; use Illuminate\Bus\Queueable; use Illuminate\Contracts\Queue\ShouldQueue; use Illuminate\Mail\Mailable; use Illuminate\Queue\SerializesModels; class DemoEmail extends Mailable { use Queueable, SerializesModels; public $mailData; /** * Create a new message instance. * * @return void */ public function __construct($mailData) { $this->mailData = $mailData; } /** * Build the message. * * @return $this */ public function build() { return $this->markdown('Email.demoEmail') ->with('mailData', $this->mailData); } } |
Create Controller to Send and Email
Now, we will create a controller that will handle the logic to send email. Let’s create DemoEmailController Controller using following command:
|
1 |
php artisan make:controller DemoEmailController |
Once the above command executed, it will create a controller file DemoEmailController.php in app/Http/Controllers/ directory. Open the DemoEmailController.php file and put the following code in it.
Controllers/DemoEmailController.php
|
1 2 3 4 5 6 7 8 9 10 11 12 13 14 15 16 17 18 19 20 21 22 23 24 25 26 |
<?php namespace App\Http\Controllers; use Illuminate\Http\Request; use Illuminate\Support\Facades\Mail; use App\Mail\DemoEmail; use Symfony\Component\HttpFoundation\Response; class DemoEmailController extends Controller { public function sendEmail() { $email = 'youremail@gmail.com'; $mailData = [ 'title' => 'Demo Email', 'url' => 'https://www.yoursite.com' ]; Mail::to($email)->send(new DemoEmail($mailData)); return response()->json([ 'message' => 'Email has been sent.' ], Response::HTTP_OK); } } |
In the DemoEmailController.php we have included DemoEmail Mailable class along with the Mail Facade and Http Response service. Later we have created controller method to send demo email from our laravel 8 application.
Create Route to Send Mail
After this, we need to add following route in “routes/web.php” to send email. Lets open “routes/web.php” file and add following route.
routes/web.php
|
1 2 |
use App\Http\Controllers\DemoEmailController; Route::get('/send-demo-email', [DemoEmailController::class, 'sendEmail']); |
Create Email Template
In this step, we will create view/blade file to setup email template. Open resources/views/Email/demoEmail.blade.php file, put the following code.
resources/views/Email/demoEmail.blade.php
|
1 2 3 4 5 6 7 8 9 10 11 12 |
@component('mail::message') {{ $mailData['title'] }} Congratulations! You received demo email. @component('mail::button', ['url' => $mailData['url']]) Cheers! @endcomponent Thanks,<br> {{ config('app.name') }} @endcomponent |
Start Development Server
Now we are ready to run our example so lets start the development server using following artisan command:
|
1 |
php artisan serve |
Send Email in Laravel
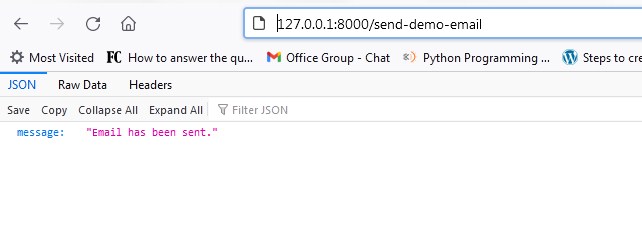
Now, open the following URL in browser to send email:
|
1 |
http://127.0.0.1:8000/send-demo-email |
Output:-

When you visit the link, you will receive the example email in your inbox.

