In this tutorial you will learn about the Laravel 5.8 Facebook Login with Socialite and its application with practical example.
Laravel 5.8 Facebook Login with Socialite
As we all know that users are not much interested in filling up long registration form to register with any application. Allowing users to login with their social media accounts is quick and powerful way to get registered/verified users for your laravel application. Allowing users to login with their social media accounts makes registration/login process much easier, it also encourages more users to register for your application. In this step by step tutorial, you will learn to integrate Facebook login with your laravel application.
- Laravel 5.8 Facebook Login with Socialite
- Install Laravel 5.8
- .env file
- Generate Application Key
- Set Default String Length
- Crate Facebook Login App
- Set Redirect URL
- Get Facebook App Id and Secret Key
- Authentication Scaffolding
- Set Authentication Routes
- Create Authentication Controllers
- Restart Development Server
- Test Laravel 5.8 Facebook Login
Install Laravel 5.8
First of all we need to create a fresh laravel project, download and install Laravel 5.8 using the below command
|
1 |
composer create-project --prefer-dist laravel/laravel socialLogin |
Configure Database In .env file
Now, lets create a MySQL database and connect it with laravel application. After creating database we need to set database credential in application’s .env file.
|
1 2 3 4 5 6 |
DB_CONNECTION=mysql DB_HOST=127.0.0.1 DB_PORT=3306 DB_DATABASE=laraSocial DB_USERNAME=root DB_PASSWORD= |
Generate Application Key
Open terminal and switch to the project directory and run the following command to generate application key and configure cache.
|
1 |
php artisan key:generate |
|
1 |
php artisan config:cache |
Set Default String Length
Locate the file “app/Providers/AppServiceProvider”, and add following line of code to the top of the file
|
1 |
use Illuminate\Support\Facades\Schema; |
and inside the boot method set a default string length as given below –
|
1 |
Schema::defaultStringLength(191); |
So this is how “app/Providers/AppServiceProvider” file looks like –
|
1 2 3 4 5 6 7 8 9 10 11 12 13 14 15 16 |
<?php namespace App\Providers; use Illuminate\Support\ServiceProvider; use Illuminate\Support\Facades\Schema; class AppServiceProvider extends ServiceProvider { public function boot() { // Schema::defaultStringLength(191); } public function register() { // } } |
Install Socialite Package via Composer
|
1 |
composer require laravel/socialite |
After Installing ‘socialite’ package, we need to add service provider and alias in config/app.php file as following.
config/app.php
|
1 2 3 4 5 6 7 8 9 |
'providers' => [ // Other service providers… Laravel\Socialite\SocialiteServiceProvider::class, ], 'aliases' => [ // Other aliases… 'Socialite' => Laravel\Socialite\Facades\Socialite::class, ], |
Crate Facebook Login App
Go to Facebook’s developers site https://developers.facebook.com/ and log in with your Facebook account. There in Facebook developers Dashboard you have option to Create App. Lets create a Facebook Login App simply providing App Name and Contact Email.

Set Redirect URL
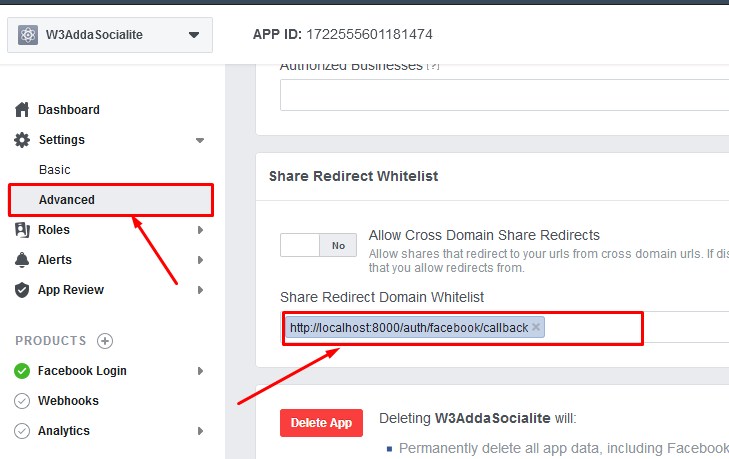
After creating the facebook app, go to setting->advanced and set redirect url like below –

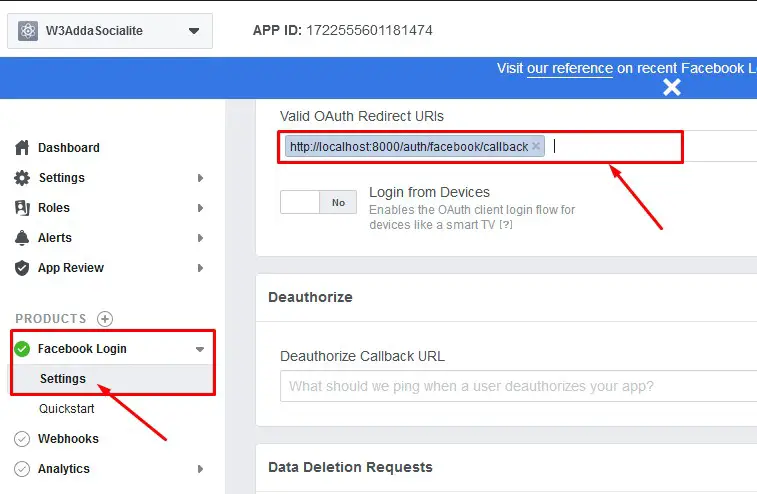
Then, go to Facebook Login -> Settings and scroll down to “Valid OAuth Redirect URL” and set your callback URL like below –

Get Facebook App Id and Secret Key

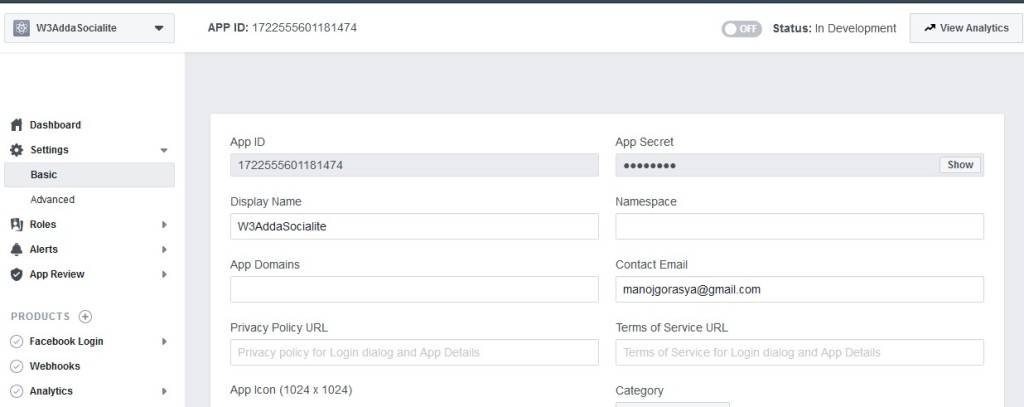
After creating app, go to Settings -> Basic and get your newly created App ID and App Secret.
Configure Laravel Socialite
Open your application .env files and set FB_CLIENT_ID, FB_CLIENT_SECRET and FB_CALLBACK_URL like below –
.env
|
1 2 3 |
FB_CLIENT_ID=xxxxxxxxx FB_CLIENT_SECRET=xxxxxxx FB_CALLBACK_URL=http://localhost:8000/auth/facebook/callback |
Here, Your App Secret becomes client_secret, and App ID becomes your client_id. Now, open config/service.php file and set client id and client secret with call back url like below –
config/service.php
|
1 2 3 4 5 6 7 8 |
return [ .... 'facebook' => [ 'client_id' => env('FB_CLIENT_ID'), 'client_secret' => env('FB_CLIENT_SECRET'), 'redirect' => env('FB_CALLBACK_URL'), ], ] |
Migrations and User Model
After installing laravel, you will see the some migration files created inside database/migrations directory for creating default create users table and password reset table. Open app/database/create_users_table.php migration file and add provider and provider_id columns to user table and also set the email and password field to nullable like below –
app/database/xxxx_xx_xx_xxxxxx_create_users_table.php
|
1 2 3 4 5 6 7 8 9 10 11 12 13 14 15 16 17 18 19 20 21 22 23 24 25 26 27 28 29 30 31 32 33 34 35 36 37 38 |
<?php use Illuminate\Support\Facades\Schema; use Illuminate\Database\Schema\Blueprint; use Illuminate\Database\Migrations\Migration; class CreateUsersTable extends Migration { /** * Run the migrations. * * @return void */ public function up() { Schema::create('users', function (Blueprint $table) { $table->bigIncrements('id'); $table->string('name'); $table->string('email')->nullable(); $table->timestamp('email_verified_at')->nullable(); $table->string('password', 60)->nullable(); $table->string('provider'); $table->string('provider_id'); $table->rememberToken(); $table->timestamps(); }); } /** * Reverse the migrations. * * @return void */ public function down() { Schema::dropIfExists('users'); } } |
After you added columns provider and provider_id to user table set the email and password field to nullable, run the migration using following command.
|
1 |
php artisan migrate |
After this, go to app/User.php and add provider and provider_id to fillable attribute in the User Model.
|
1 2 3 |
protected $fillable = [ 'name', 'email', 'password', 'provider', 'provider_id' ]; |
Authentication Scaffolding
Laravel comes with in-built basic authentication system, use the below command to generate default authentication scaffolding –
|
1 |
php artisan make:auth |
This command will generate required Controller files, views and add routes in our web.php routes file that are required for basic authentication system.
Set Authentication Routes
Now, open app/routes/web.php file and add following two routes for redirecting the user to the OAuth provider and to handle the callback from provider.
app/routes/web.php
|
1 2 |
Route::get('auth/{provider}', 'SocialController@redirect'); Route::get('auth/{provider}/callback', 'SocialController@callback'); |
Create Authentication Controllers
Next, we have to create a controller to handle facebook login. Create a controller named SocialController using command given below –
|
1 |
php artisan make:controller SocialController |
When controller is created successfully go to app/controllers/SocialController.php and put the below code.
app/controllers/SocialController.php
|
1 2 3 4 5 6 7 8 9 10 11 12 13 14 15 16 17 18 19 20 21 22 23 24 25 26 27 28 29 30 31 32 33 34 35 |
<?php namespace App\Http\Controllers; use Illuminate\Http\Request; use Validator,Redirect,Response,File; use Socialite; use App\User; class SocialController extends Controller { public function redirect($provider) { return Socialite::driver($provider)->redirect(); } public function callback($provider) { $uInfo = Socialite::driver($provider)->user(); $user = $this->findOrCreate($uInfo,$provider); auth()->login($user); return redirect()->to('/home'); } function findOrCreate($uInfo,$provider){ $user = User::where('provider_id', $uInfo->id)->first(); if (!$user) { $user = User::create([ 'name' => $uInfo->name, 'email' => $uInfo->email, 'provider' => $provider, 'provider_id' => $uInfo->id ]); } return $user; } } |
In this controller, we have following two methods –
redirect() :- to redirect the user to Facebook
callback() :- to handle callback from Facebook
No, open resources/views/auth/login.blade.php file and add the following code below the closing tag for <div class=”form-group”>. This will append a facebook login button just below the default login form.
resources/views/auth/login.blade.php
|
1 2 3 4 5 6 |
<hr> <div class="form-group row mb-0"> <div class="col-md-8 offset-md-4"> <a href="{{ url('/auth/facebook') }}" class="btn btn-primary"><i class="fa fa-facebook"></i> Facebook</a> </div> </div> |
Restart Development Server
Restart the development server using following artisan command –
|
1 |
php artisan serve |
Now, visit the following URL in browser to see the output –
http://localhost:8000/
Output:-
 Test Laravel 5.8 Facebook Login
Now, visit the login page to test the facebook login –
http://localhost:8000/login

When you click “Facebook” button, you will be redirected/requested to login with facebook. After you successfully login you will be registered and logged in to your application and you will be redirected to user dashboard.

