In this tutorial you will learn about the R Matrix and its application with practical example.
R Matrix
Matrix is a two dimensional data structure, where elements are arranged in rows and columns. It can thought as combination of two or more vectors of same data type. Following is an example of a 2×4 matrix with 2 rows and 4 columns.

Creating a Matrix
A matrix is created using the matrix() function. The values for matrix rows and matrix columns is defined using nrow and ncol arguments. However, it is not required to provide value for both as it automatically evaluate the value for other dimension using length of matrix.
Syntax:-
|
1 |
matrix(data, nrow, ncol, byrow = FALSE) |
Above is the general syntax of matrix() function, here
data:- It is a vector input which will arranged as matrix.
nrow:- Number of rows.
ncol:- Number of columns.
byrow:- If it is TRUE values being filled by row (left to right). If it is FALSE values being filled by Column(top to bottom). Default is FALSE.
Example:-
Here we are creating two 5×2 matrix which contains number from 1 to 10 keeping byrow = TRUE for and byrow = FALSE for other to check the difference.
|
1 2 3 4 5 6 |
print("W3Adda - R Matrix with byrow = TRUE") matrixA <- matrix(c(1:10), nrow = 5, byrow = TRUE) matrixA print("W3Adda - R Matrix with byrow = FALSE") matrixB <- matrix(c(1:10), nrow = 5, byrow = FALSE) matrixB |
Output:-

Accessing Matrix Element
Matrix elements can be accessed by using the row and column index of the element as following –
Syntax:-
|
1 |
matrix[row,col] |
matrix:- Matrix name
row:- row index of the element, if not provided specified row elements will be fetched for all columns.
col:- column index of the element, if not provided specified column elements will be fetched for all rows.
Example:-
Let’s have a 3×5 matrix which contains number from 1 to 15 keeping byrow = TRUE. Now, we are accessing different matrix elements as following –
|
1 2 3 4 5 6 7 8 9 10 11 12 13 14 |
print("W3Adda - R Access Matrix Elements") A <- matrix(c(1:15), nrow = 3, byrow = TRUE) A # Access the element at 1st row and 3rd column. print(A[1,3]) # Access the element at 2nd row and 5th column. print(A[2,5]) # Access only the 1st row. print(A[1,]) # Access only the 5th column. print(A[,5]) |
When we run the above R script, we see the following output –
Output:-

Update Matrix Element
A matrix element can be modified by accessing element using above method and assigning it new value.
Example:-
|
1 2 3 4 5 6 7 8 9 |
print("W3Adda - R Update Matrix Elements") A <- matrix(c(1:15), nrow = 3, byrow = TRUE) A print("Before Update") print(A[2,3]) print("After Update") A[2,3] <- 10 print(A[2,3]) A |
Output:-

Matrix rbind() and cbind() Function
The rbind() and cbind()function is used to add a row and column respectively to a matrix.
Example:-
|
1 2 3 4 5 6 |
A <- matrix(c(1:9), nrow = 3, byrow = TRUE) A print("W3Adda - Matrix Add One Column") cbind(A, c(1, 2, 3)) # add column print("W3Adda - Matrix Add One Row") rbind(A,c(1,2,3)) # add row |
Output:-

R Transpose a Matrix
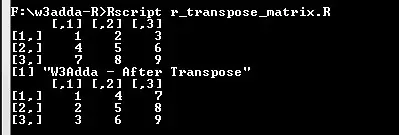
The t() function is used to transpose a matrix.
Example:-
|
1 2 3 4 5 |
A <- matrix(c(1:9), nrow = 3, byrow = TRUE) A print("W3Adda - After Transpose") A <- t(A) A |
Output:-


