In this tutorial you will learn about the ReactJS Components and its application with practical example.
ReactJS Components
Components are the basic building blocks of any ReactJS application. React Components are simply independent, reusable code block which usually contains HTML/Javascript code. This way you can split the application UI into independent reusable components/module. Component’s data is saved in its state, this state can be changed based upon the user action. As the component’s state changes the ReactJS re-renders the component on browser.
ReactJS Components Type
A ReactJS component can be one of following two types –
- Functional Components (Stateless Components)
- Class Components
Creating ReactJS Components
There are several ways you can create a components in React.
Functional Components (Stateless Components)
A functional component represents the simplest form of a ReactJS component. It can be easily defined by just writing a JavaScript function as following –
|
1 2 3 |
function Hello(props) { return <h1>Hello, {props.name}!</h1>; } |
The above Javascript function represents a valid React component, because it receives a single object of properties (props) as function argument and returns DOM Element in special HTML like syntax called JSX.
Example :-
|
1 2 3 4 5 6 7 8 |
var React= require('react'); var ReactDOM = require('react-dom'); function Hello(props) { return <h1>Hello, {props.name}!</h1>; } ReactDOM.render(<Hello name="W3Adda" />, document.getElementById('hello-world-wrapper')); |
Class Components (ES6 class)
Class components are defined in much richer way than the functional components, let’s take a look on following Class component definition –
|
1 2 3 4 5 |
class Hello extends React.Component { render () { return <h1> Hello {this.props.name}!</h1>; } } |
In comparison to functional components the class components comes with some additional capabilities. Class components receives props same as functional components, but in addition it also maintains a additional private input “State” that keeps the track of component’s internal state.
Example :-
|
1 2 3 4 5 6 7 8 9 10 |
var React= require('react'); var ReactDOM = require('react-dom'); class Hello extends React.Component { render () { return <h1> Hello {this.props.name}!</h1>; } } ReactDOM.render(<Hello name="W3Adda" />, document.getElementById('hello-world-wrapper')); |
Here, In order to create a class component you are require to create a javascript class that extend from React.Component class and define at least a render() method. React.Component is an abstract base class, so you must have to implement render() method when creating component. The render() method inside a component is used to specify JSX that you want to be rendered when that component is called using RenderDOM.render method.
Rendering a ReactJS Component
The ReactDOM.render() method is used to call the reactJS components, it render JSX expressions to the DOM. It expects an component instance as first parameter, and a HTML element to which the DOM of the element object will be mounted.The ReactDOM.render() method can be used to call a component as following –
|
1 2 3 4 5 |
const element = <Hello name="W3Adda" />; ReactDOM.render( element, document.getElementById('hello-world-wrapper') ); |
or
|
1 |
ReactDOM.render(<Hello name="W3Adda" />, document.getElementById('hello-world-wrapper')); |
Here, we have called ReactDOM.render() method with the <Hello name=”W3Adda” /> element, it tells React to call the Hello component with {name: “W3Adda”} as its props. Our Hello component returns a <h1>Hello W3Adda!</h1> element as the result which will be appended to document.getElementById(‘hello-world-wrapper’) . Both the above code block represents the same result.
Example :- In this example we will be creating a Class Components using ES6 syntax, In this example we will use the same application that we created in ReatcJS Installation.
Step 1:- Let’s open src/app/index.js file that we created in myreact application.

Step 2:- Now, delete the existing code and put the following code in it and save it-
|
1 2 3 4 5 6 7 8 9 10 |
var React= require('react'); var ReactDOM = require('react-dom'); class Hello extends React.Component { render () { return <h1> Hello {this.props.name}!</h1>; } } ReactDOM.render(<Hello name="W3Adda" />, document.getElementById('hello-world-wrapper')); |
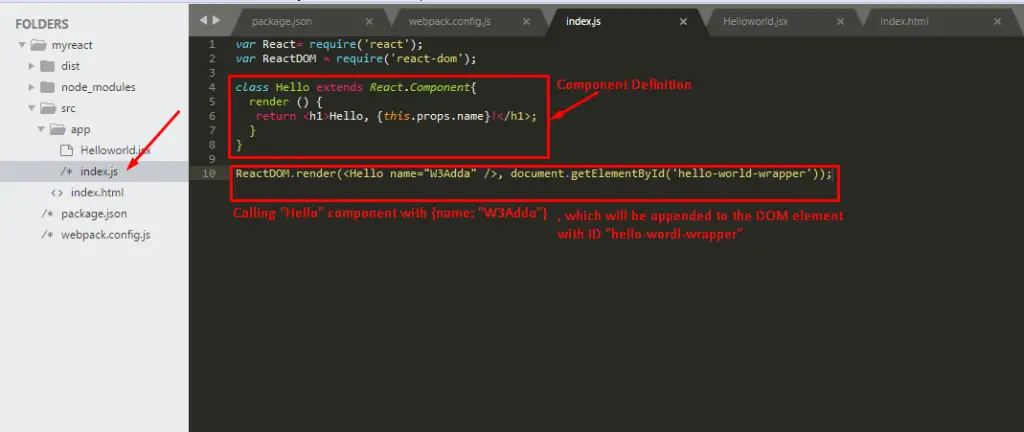
src/app/index.js will now look like this –

Here, we are creating a “Hello” Component by creating a “Hello” class that extends the React.Component class.
Inside of “Hello” class we have created a render method which is a part of React.Component class, it return a message enclosed in <h1></h1> tag.
|
1 |
ReactDOM.render(<Hello name="W3Adda" />, document.getElementById('hello-world-wrapper')); |
here, we are calling ReactDOM.render method, it takes first argument as the component we want to render, and the second is the DOM element where the component is to be mounted. Here, we are mounting our “Hello” to a DOM Element that we have available in src/index.html file –

Step 3:- Let’s open the terminal again, change directory to your project folder and type the following command in order to run the server.
|
1 |
F:\reactprj\myreact>npm start |
Step 4:- Now open the following URL in browser to view the output
http://localhost:1234
Step 5:- You will see the following screen.


