In this tutorial you will learn about the ReactJS Props Validation and its application with practical example.
ReactJS Props Validation
React comes with an internal mechanism for validating props data type to make sure that values passed through props is valid. React components uses a special property called “propTypes” to setup data type validation. Although, we are allowed to define components without PropTypes. But, with PropTypes we can avoid unexpected bugs or glitches to the users. The PropTypes is provided with props and their respective PropTypes for type-checking. When a prop is passed in with an invalid type or fails the prop type, a warning is passed into the JavaScript console.
Syntax:-
|
1 2 3 4 |
class Component extends React.Component { render() {} } Component.propTypes = {/* definition goes here*/}; |
ReactJS Props Validators
The React.PropTypes object contains a list of validators for basic data types –
PropTypes.any :- the prop can be of any data type
PropTypes.bool :- the prop should be a boolean
PropTypes.number :- the prop should be a number
PropTypes.string :- the prop should be a string
PropTypes.func :- the prop should be a function
PropTypes.array :- the prop should be an array
PropTypes.object :- the prop should be an object
PropTypes.symbol :- the prop should be a symbol
PropTypes.instanceOf :- the prop should be an instance of a particular JavaScript class
PropTypes.isRequired :- the prop should be provided
Example:-
Step 1:- Let’s open src/App.js, delete the existing code and put the following code in it and save it.
|
1 2 3 4 5 6 7 8 9 10 11 12 13 14 15 16 17 18 19 20 21 22 23 24 25 26 27 28 29 30 31 32 33 34 35 36 37 38 39 40 41 42 43 44 45 46 47 48 49 50 51 52 53 54 55 56 |
import React from 'react'; import PropTypes from 'prop-types'; class App extends React.Component { render() { return ( <div> <h1>W3Adda - ReactJS Props Validation</h1> <table> <tr> <th>Type</th> <th>Default Value</th> <th>Valid</th> </tr> <tr> <td>Array</td> <td>{this.props.propArray}</td> <td>{this.props.propArray ? "True" : "False"}</td> </tr> <tr> <td>Boolean</td> <td>{this.props.propBool ? "True" : "False"}</td> <td> {this.props.propBool ? "True" : "False"}</td> </tr> <tr> <td>String</td> <td>{this.props.propString}</td> <td>{this.props.propString ? "True" : "False"}</td> </tr> <tr> <td>Number</td> <td>{this.props.propNumber}</td> <td>{this.props.propNumber ? "True" : "False"}</td> </tr> </table> </div> ); } } App.propTypes = { propArray: PropTypes.array.isRequired, propBool: PropTypes.bool.isRequired, propNumber: PropTypes.number, propString: PropTypes.string } App.defaultProps = { propArray: [1,2,3,4,5], propBool: true, propNumber: 1, propString: "Hello, World!" } export default App; |
Step 2:- Let’s open the terminal again, change directory to your project folder and type the following command in order to run the server.
|
1 |
npm start |
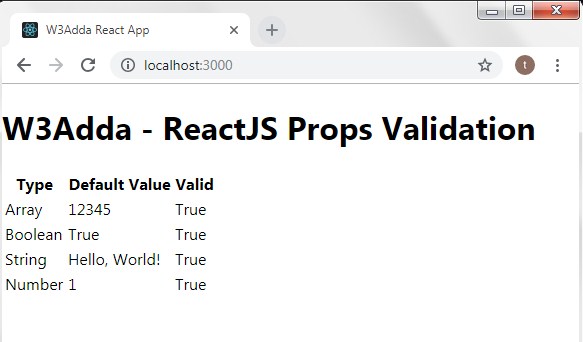
Step 3:- Now open the following URL in browser to view the output
http://localhost:3000
Step 4:- You will see the following screen.

ReactJS Custom Validator
In React, we are allowed to create a custom validation function to perform custom validation as per our requirement. In order to create a custom validation function, we are required to create a function following arguments –
props :- The props passed to the component
propName :- The propName being validated
componentName :- The componentName we’re validating agains
Example:-
|
1 2 3 4 5 6 7 8 9 10 11 |
const Component = React.createClass({ propTypes: { item: function(props, propName, componentName) { const item = props[propName]; if (!item.isValid()) { return new Error('Invalid item'); } } }, // ... }) |

