
In this tutorial you will learn about the Swift Break Statement and its application with practical example.
Swift Break Statement
In Swift, break statement inside any loop gives you way to break or terminate the execution of loop containing it, and transfers the execution to the next statement following the loop. It is almost always used with if..else construct.
Swift Break Statement Flow Diagram
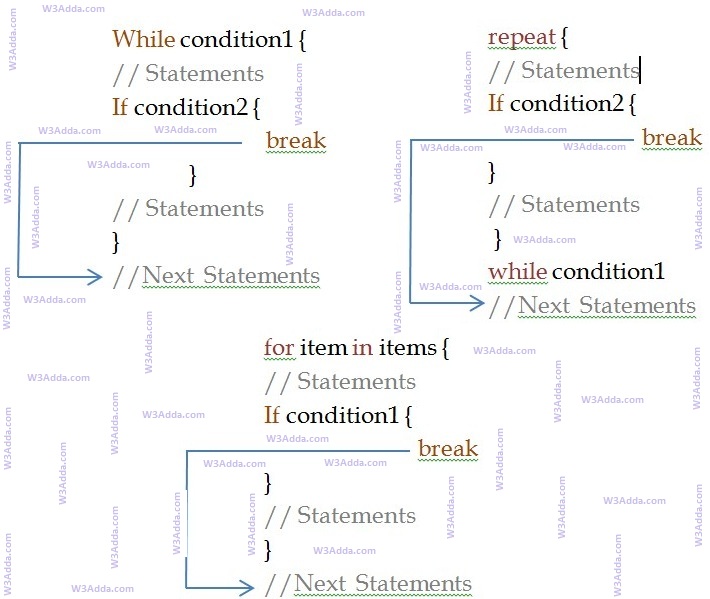
swift_break_statement
Syntax:-
|
1 |
break |
Example:-
|
1 2 3 4 5 6 7 8 9 10 |
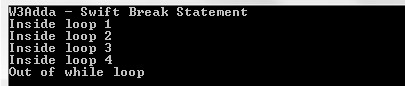
var count:Int = 0 print("W3Adda - Swift Break Statement") while count <= 10 { count = count + 1 if count == 5 { break } print("Inside loop \(count)") } print("Out of while loop") |
In this above program, the variable count is initialized as 0. Then a while loop is executed as long as the variable count is less than 10. Inside the while loop, the count variable is incremented by 1 with each iteration (count = count + 1). Next, we have an if statement that checks the variable count is equal to 5, if it return TRUE causes loop to break or terminate. Within the loop there is a print() statement that will execute with each iteration of the while loop until the loop breaks. Then, there is a final print() statement outside of the while loop.
When we run this code, our output will be as follows –
Output:-
swift_break_statement
Swift Labeled break
The standard unlabeled break statement is used to terminates the nearest enclosing loop. In Swift, there is another form of break (labeled break) statement is used to terminate specified loop and control jumps to the statement immediately following the labeled statement. In Swift, Label is an identifier which is followed by colon (:) sign, for example abc:, test:.
Example:-
|
1 2 3 4 5 6 7 8 9 |
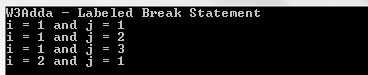
print("W3Adda - Labeled Break Statement") outer: for i in 1...5 { for j in 1...3 { print("i = \(i) and j = \(j)") if (i == 2){ break outer } } } |
Here, when i == 2 expression is evaluated to true, break outer is executed which terminates the loop marked with label outer:.
When we run this code, our output will be as follows –
Output:-
swift_labeled_break_statement
